Introduction
For as long as I can remember, I’ve been fascinated by systems—how they work, how they break, and how they can be made better. As a developer, I’ve always sought ways to streamline my workflows and take control of my tools. That’s why I decided to build my own Kubernetes cluster at home. Driven by my passion for systems and coding, I wanted to create a self-owned cloud. I also believe that individual control of digital infrastructures leads to a more balanced world. Setting up everything myself — from installing the OS on blank machines to deploying apps using GitOps — was an incredible learning experience. Whether you’re a technical expert or a curious wanderer, you can follow my thought process and get a practical understanding on how to set up a Kubernetes cluster.
Hardware
My father gave me his old computer, with an i5, 32Gb ram. I added my old laptop with an i7, 16Gb ram . On both machines, I installed :
- Debian 12
- My zsh shell (oh-my-zsh, some plugins, powerlevel10k)
- Tmux for session management
- SSH. I read somewhere that lots of bots are scanning open ports for SSH brute force hacking, so I :
- Changed the default port
- Enabled private key authentification only
- Added X11 forwarding for GUI support (primarly for VMs and Timeshift backups).

Having a comfortable setup is crucial to me, it reduces unnecessary complexity when troubleshooting problems. Now that we can easily connect and manipulate our servers, let’s talk a bit about networking.
Network
In my home, we have a basic router with a commercial ISP. I requested our IP to be static, and created forward rules for SSH (on my custom ports), HTTP/S, and some mailing ports (requested our ISP to open port 25). At this point, I should have spent more time setting up a private DNS to easily identify my machines, set up network traffic monitoring and a private certificate authority. You should do it if you are planning to create your own infrastructure like me ! Since networking is my weak point, I imagined a simple setup for my cluster : dad’s server acts as the entry point, all ingress traffic to the cluster will pass through the i5 server (more on that later).
graph TD
    subgraph Network global view
        ISP(ISP)
        HomeRouter(Home Router)
        DadsComputer("Dad's computer")
        OldLaptop("Old laptop")

        ISP ---|gives static ip| HomeRouter
        HomeRouter ---|SSH| DadsComputer
        HomeRouter ---|SMTP| DadsComputer
        HomeRouter ---|HTTP/S| DadsComputer
        HomeRouter ---|SSH| OldLaptop
    end
VMs
With my initial setup completed, I was ready for my next challenge: virtual machines. Running the cluster directly on bare metal wasn’t ideal for me — I wanted the flexibility to test multiple configurations and easily destroy or recreate setups. Here’s how I approached it:
VM Configuration
- 2 VMs per machine
- Each with 2 CPUs and 8Gi of RAM
- Bridged IP address. The bridge was really useful for my VMs to have their own IP addresses given to them by my router. This way, they appear as separate machines on my network and can easily communicate with each other.
bridge configuration raw markdown link
Virtualisation tools
- KVM (Kernel-based Virtual Machine). Bypass the hypervisor and run the vm directly on the host kernel. Not compatible with all cpus.
- Virsh (Libvirt). Handles the heavy lifting of the virtualisation management.
Infrastructure As Code
As a good developer, I absolutely needed IaC (Infrastructure as Code) to have automatisation, versioning, and iterative update. I opted for Vagrant over Terraform primarily because of its cleaner Ruby syntax, and also because of its focus on VM (while terraform excels at cloud infrastructure). Both are HashiCorp tools. Here is the Vagrantfile for my 2 first VMs :
Vagrant.require_version '>= 2.0.4'

$num_node = 2

Vagrant.configure("2") do |config|
  config.vm.box = "generic/debian12"

  config.vm.provision "shell", inline: <<-SHELL
    sudo apt-get update
    sudo apt-get install -y nfs-common
  SHELL

  (1..$num_node).each do |i|
    config.vm.define "k8s-#{i}" do |node|
      node.vm.provider "libvirt" do |v|
        v.memory = 8192
        v.cpus = 2
      end
      node.vm.network "public_network",
        :ip => "192.168.1.18#{i}",
        :dev => "br0",
        :mode => "bridge",
        :type => "bridge",
        :mac => "5A74CA28570#{i}"

      node.vm.network "private_network", ip: "192.168.10.5#{i}"
    end
  end
end
Initaly, I wanted to use flannel as the OS. It’s specialised for containers. But i could not get it to work ! So i switched back to what I know, Debian. Getting Libvirt and vagrant to work together required specific version of vagrant, and env variable configuration. I left vagrant default security (for SSH connections) which uses private key, and I set via Libvirt the VMs to auto-start.
graph TD
    HR(Home Router)

    subgraph Dad_s_computer ["Dad's computer"]
        Eno1_Dad["eno1
(default interface)"]
        Br0_Dad["br0
(bridged interface)"]
        VM1("VM 1
192.168.1.181
2 cpu
8 Gb ram")
        VM2("VM 2
192.168.1.182
2 cpu
8 Gb ram")

        Br0_Dad --> VM1
        Br0_Dad --> VM2
    end

    subgraph Old_computer [Old computer]
        Eno1_Old["eno1
(default interface)"]
        Br0_Old["br0
(bridged interface)"]
        VM3("VM 3
192.168.1.191
2 cpu
8 Gb ram")
        VM4("VM 4
192.168.1.192
2 cpu
8 Gb ram")

        Br0_Old --> VM3
        Br0_Old --> VM4
    end

    HR -- default connection --> Eno1_Dad
    HR -- "router to vm through bridge" --> Br0_Dad

    HR -- default connection --> Eno1_Old
    HR -- "router to vm through bridge" --> Br0_Old
Cluster Installation
Kubespray
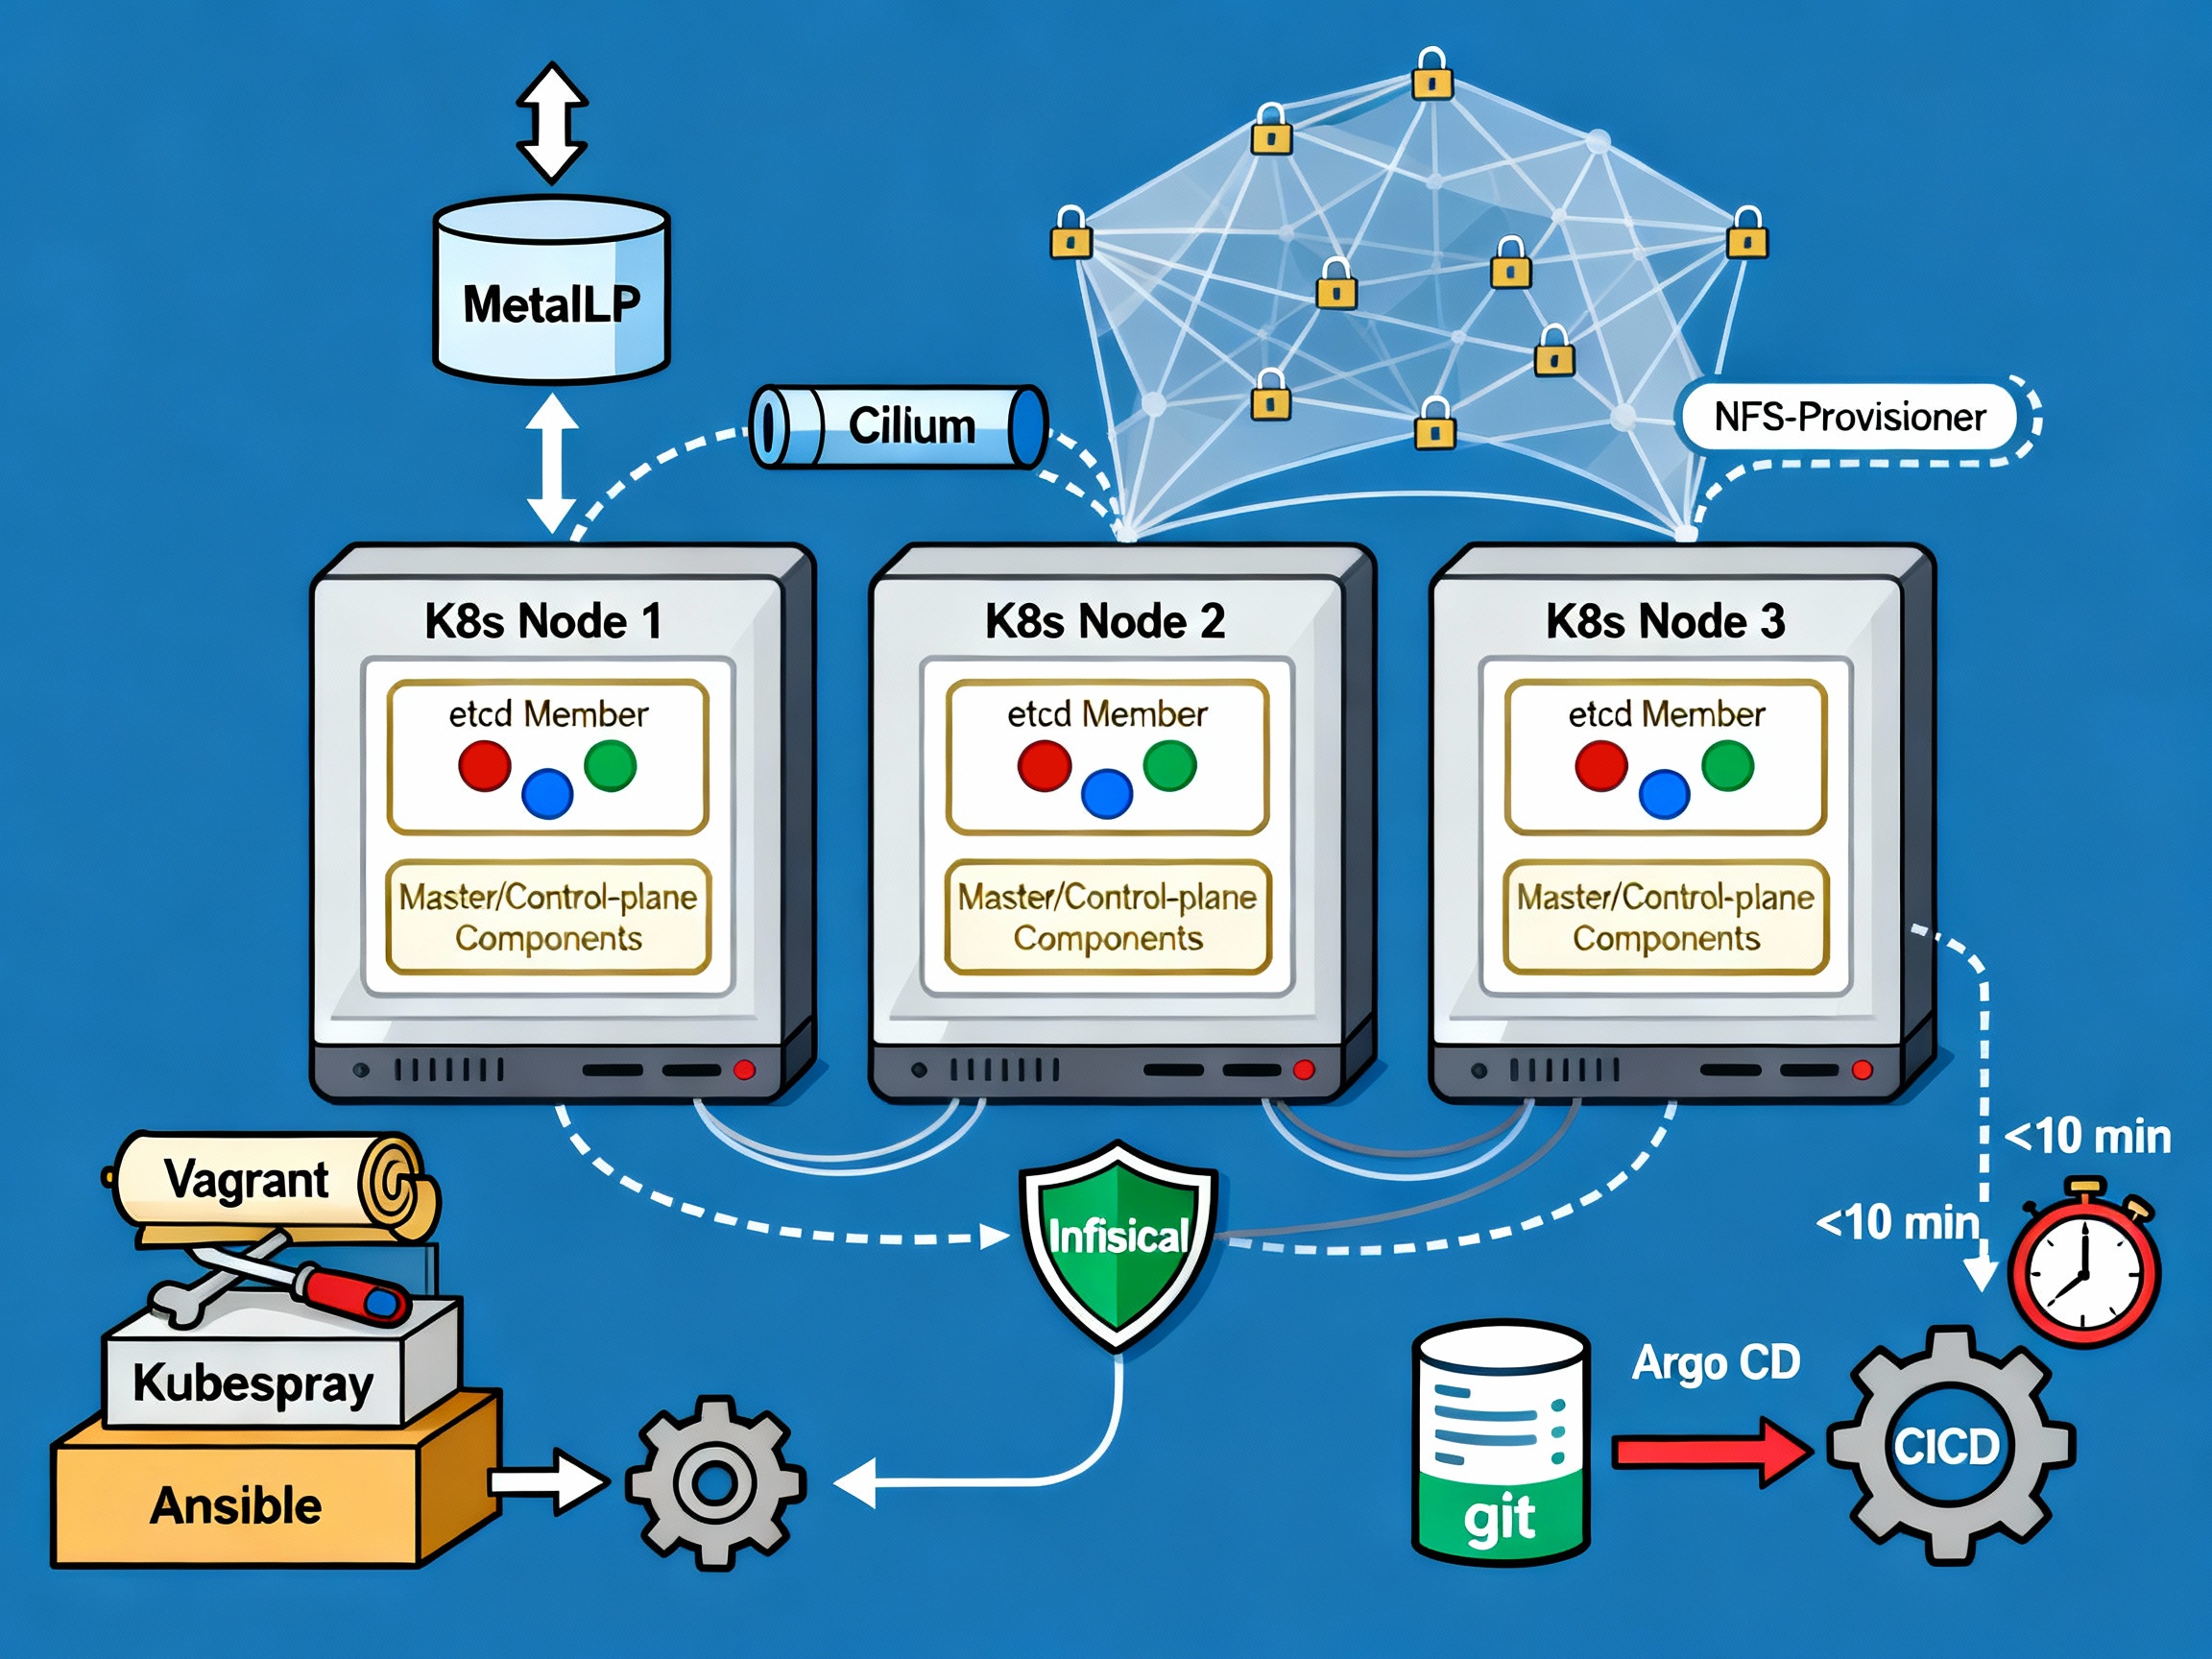
Now that I have my hardware, network, and VMs ready, let’s move on to actually installing the Kubernetes cluster. I initially used a basic Kubeadm script injected into my control node VM to set up the cluster. But this was cumbersome, as I had to then manually add the nodes and install the required tools (CNI, CRI, LB…). Stumbling upon Kubespray, it was the perfect solution. Open source, Ansible-based, fully configurable. Getting it to work was a pleasure because of the clear documentation and configuration only process. Kubespray makes it easy to install, manage and upgrade clusters. We can add/remove nodes or applications (argoCD, krew…), and configure vital parts of our cluster (CNI, provisioner, load balancer…). For my needs, I used :
- Cert-manager with fallback DNS servers because I had issues with unresolved DNS names on my services
- Cilium as my network plugin (CNI). I may test ePBF one day, it seems like a really cool technology
- MetalLB as my bare metal load balancer. I had to label my server 1 nodes to enable metalLB only on them, for the purpose of having a single entry point
- 2 control planes, 3 etcd replicas
Hosts (and control node) configuration :
all:
  hosts:
    node1:
      ip: 192.168.1.xxx
    node2:
      ip: 192.168.1.xxx
    node4:
      ip: 192.168.1.xxx
    node5:
      ip: 192.168.1.xxx
  children:
    kube_control_plane:
      hosts:
        node1:
        node2:
    kube_node:
      hosts:
        node1:
        node2:
        node4:
        node5:
    etcd:
      hosts:
        node1:
        node2:
        node4:
    k8s_cluster:
      children:
        kube_control_plane:
        kube_node:
MetalLB configuration :
# MetalLB deployment
metallb_enabled: true
metallb_speaker_enabled: '{{ metallb_enabled }}'
metallb_namespace: 'metallb-system'
metallb_version: 0.13.9
metallb_protocol: 'layer2'
metallb_config:
  speaker:
    nodeselector:
      kubernetes.io/os: 'linux'
      metallb-speaker: 'enabled' # to select only server 1 nodes
    tolerations:
      - key: 'node-role.kubernetes.io/control-plane'
        operator: 'Equal'
        value: ''
        effect: 'NoSchedule'
  controller:
    nodeselector:
      kubernetes.io/os: 'linux'
      metallb-controller: 'enabled' # to select only server 1 nodes
    tolerations:
      - key: 'node-role.kubernetes.io/control-plane'
        operator: 'Equal'
        value: ''
        effect: 'NoSchedule'
  address_pools:
    primary:
      ip_range:
        - 192.168.xx.10-192.168.xx.50 # don't need more than probably 20 ips
      auto_assign: true
  layer2:
    - primary
graph TD
%% External Components
Internet[Internet] --> MetalLB
%% Nodes
subgraph Kubernetes Cluster
subgraph Control Plane
Node1["Node1 (Control Plane)"] --> MetalLB[MetalLB]
Node2["Node2 (Control Plane)"] --> MetalLB
end
subgraph Worker Nodes
Node3["Node3 (Worker)"]
Node4["Node4 (Worker)"]
end
end
%% Connect Components
MetalLB --> Node3
MetalLB --> Node4
%% Labels and Annotations
style MetalLB fill:#90EE90,stroke:#333,stroke-width:2px
style Node1 fill:#ADD8E6,stroke:#333,stroke-width:2px
style Node2 fill:#ADD8E6,stroke:#333,stroke-width:2px
style Node3 fill:#ADD8E6,stroke:#333,stroke-width:2px
style Node4 fill:#ADD8E6,stroke:#333,stroke-width:2px
style Internet fill:#D3D3D3,stroke:#333,stroke-width:2px
%% Sub-labels
MetalLB -.-> MetalLBLabel["Layer 2 Mode IP Range: 192.168.xx.10-192.168.xx.50"]
Then, all I had to do was run the ansible script and after some time, my Kubernetes cluster was up ! With the cluster running, I focused on installing the essential tools to make it accessible, manageable, and user-friendly.
Required Tools
Now, I need to install the required tools to manage my applications on the newborn cluster. First, the reverse proxy : where and how to route user traffic based on urls, host and rules. I chose Traefik because I had some experience with it, and for its basic but powerful capabilities. Installing it with helm was a breeze. Since I have multiple domain names I must manage my certificates separately. For now, I use IngressRoute CRDs, but I plan on moving to GatewayAPI in the next few months. Next, I need to have storage ready for my pods’ volume. I created an NFS folder on my server1, and used the Kubernetes nfs provisioner to setup my default storage class. As the default, any Persistent Volume (Claim) will use this storage. NFS was ideal because of the multiple machines running my cluster, they had to find a way to communicate on the same storage space. For the secrets, I used Infisical. It has a Kubernetes operator which injects secrets as env variables or as files for maximum security if needed. It’s connected to my Postgres instance (more on that later), and posed no significant challenges. Finally, GitOps is a must. With ArgoCD in place, I have the CD of my pipelines automatically deploying the resources to my cluster and keeping them in sync with my Github repos. Adding the secret key to access private repository, correctly setting up kustomize to handle the versioning were some of the challenges. I had syncing issues with Infisical secrets because of the polling performed by the secret watcher, which made argoCD believe the resources was never fully synced. I resolved this by managing the secrets manually.
graph TD
    %% External Components
    GitHub[GitHub Repo] --> ArgoCD

    %% Nodes
    subgraph Kubernetes Cluster
        subgraph Control Plane
            Node1["Node1 (Control Plane)"] --> Infisical[Infisical]
            Node1 --> ArgoCD[ArgoCD]
            Node1 --> NFS[NFS Storage]
        end

        subgraph Worker Nodes
            Node3["Node3 (Worker)"] --> Traefik[Traefik]
            Node4["Node4 (Worker)"] --> Traefik
        end
    end

    %% Connect Components
    Traefik --> KubernetesPods[Kubernetes Pods]
    NFS --> PersistentVolumes[Persistent Volumes]
    Infisical --> KubernetesPods
    ArgoCD --> KubernetesManifests[Kubernetes Manifests]

    %% Labels and Annotations
    style Traefik fill:#90EE90,stroke:#333,stroke-width:2px
    style NFS fill:#FFA07A,stroke:#333,stroke-width:2px
    style Infisical fill:#DDA0DD,stroke:#333,stroke-width:2px
    style ArgoCD fill:#DDA0DD,stroke:#333,stroke-width:2px
    style Node1 fill:#ADD8E6,stroke:#333,stroke-width:2px
    style Node3 fill:#ADD8E6,stroke:#333,stroke-width:2px
    style Node4 fill:#ADD8E6,stroke:#333,stroke-width:2px
    style GitHub fill:#D3D3D3,stroke:#333,stroke-width:2px

    %% Sub-labels
    Traefik -.-> TraefikLabel["Routes traffic based on URLs
    Manages IngressRoute CRDs"]
    NFS -.-> NFSLabel["Default Storage Class Shared storage for Pods"]
    Infisical -.-> InfisicalLabel["Injects secrets as env vars/files
    Connected to PostgreSQL"]
    ArgoCD -.-> ArgoCDLabel["Syncs Kubernetes manifets
    Uses Kustomize for versioning"]
There was a lot of trial and errors to achieve this stable configuration. As a developper, I focused on the application side and wanted to develop my APIs with ease. I created a github template repo for golang apis with the right Github action workflows and Kubernetes manifest to really focus on the functionalities. I still need to upgrade my security and observability : since I don’t have a lot of users (mainly family and friends), I don’t have the immediate need for telemetry, metrics and security. But to learn, I will focus on these parts for the next iteration of my cluster upgrade, with tools like OpenTelemetry, Grafana, Prometheus, Jaeger or Checkov.
Database
Kubernetes is stateless in nature. Data is stateful in nature. I felt there was an incompatibility in running any database in my cluster. It also complicates retry and error handling (for the whole cluster), even with Persistent Volumes in place. To ensure stability and performance, I created a dedicated VM for my database — isolating it from the Kubernetes cluster.
After searching for solutions, I found Pigsty, a Postgres for everything database setup tool. It handles clusters and node, I can manage extensions like pg_vector, users and integrate tools like minIO (S3 bucket) or ferretDB (mongoDB). Postgres is a great database, open source, open to plugins because of its architecture (extensible without having to touch the core).
# Example of a database with the pgvector extension, allowing RAG for AI agents
- name: n8nuserdb # REQUIRED, `name` is the only mandatory field of a database definition
comment: n8n user db # optional, comment string for this database
owner: dbuser_n8n # optional, database owner, postgres by default
extensions: # optional, additional extensions to be installed: array of `{name[,schema]}`
  - { name: vector, schema: public }
It uses Ansible and YAML configuration files to manage the cluster. Then I simply run commands like bin/pgsql-user pg-meta dbuser_xxx to add a user to the database (but also to the Pgbouncer). Many of the commands are idempotent! It feels like a natural continuation of my toolset, as it’s similar to Kubespray but for the Postgres world.
I went on and created a VM, with the 2 CPUs, 8 Gb memory and rocky9 image. It’s been great, but since all my data is on it, I am terrified of upgrading! My next goals for the database domain are :
- upgraded security and monitoring
- create new nodes for replication and backup
- have a better understanding of the pigsty ecosystem and commands
Alright. I think we have everything. Let’s have some fun now.
Apps and APIs
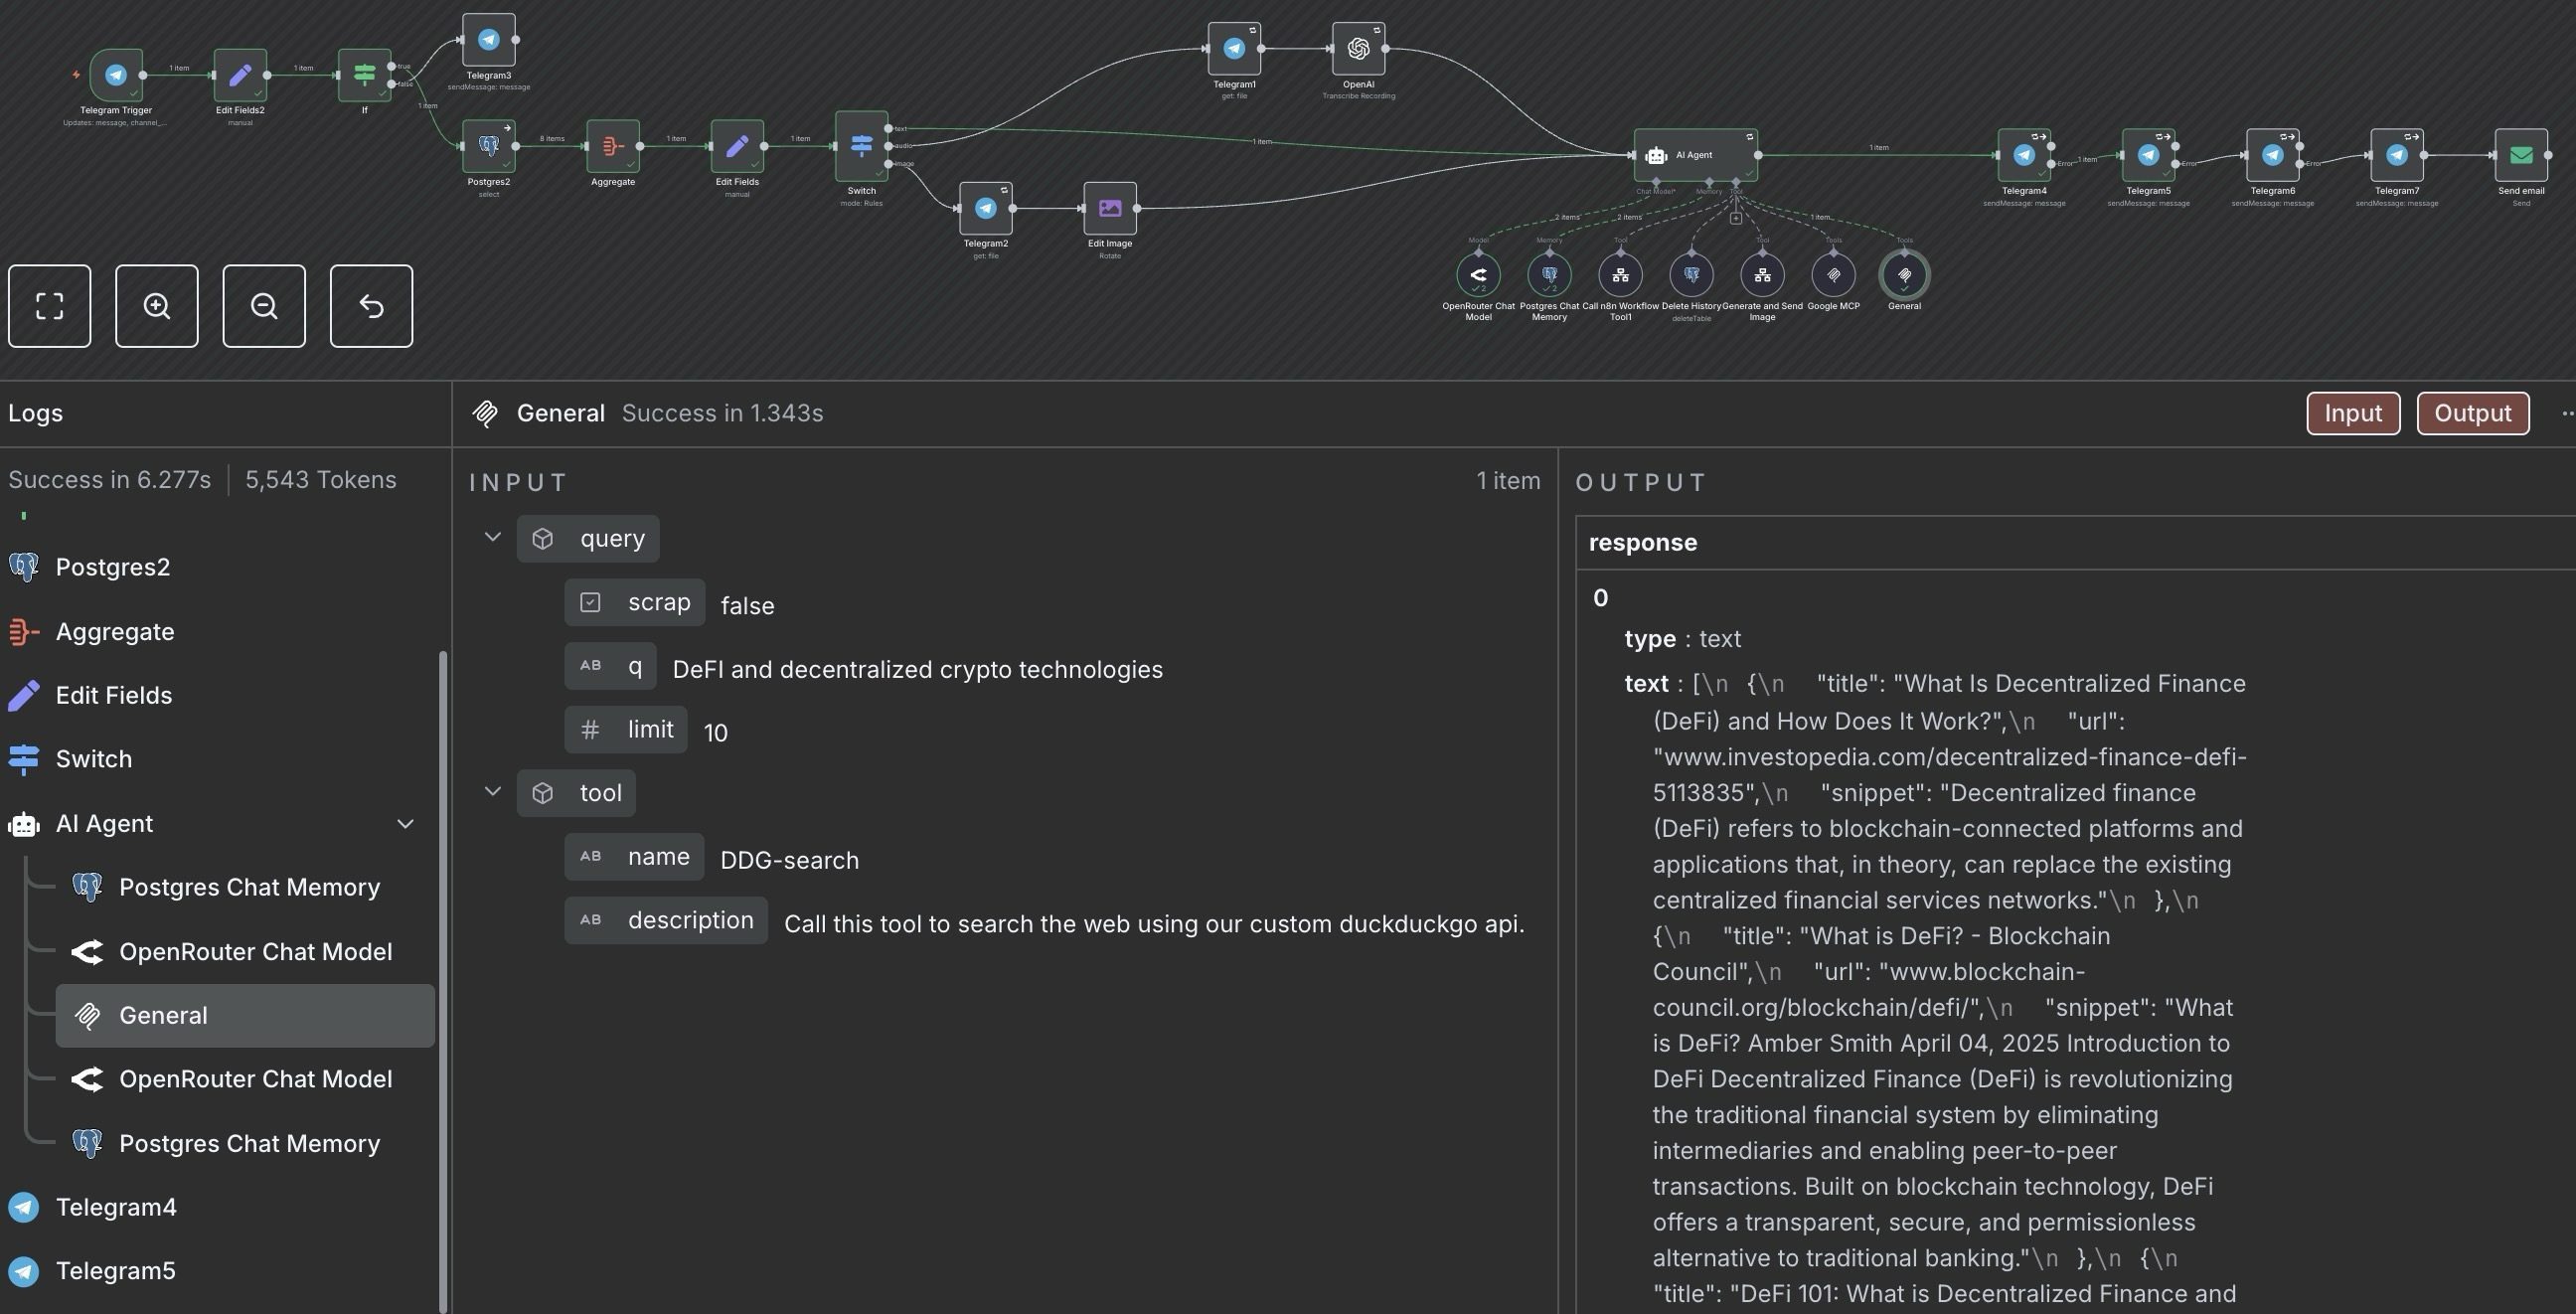
I love building things, and I love things that help me build things. So I started with N8N, a workflow building application that is fitted to connect AI agents to a large set of tools like Gmail/SMTP, Calendar, Clickup, Telegram, Postgres databases… For example, I created a gemini AI agent with access to my Google tools (Gmail and Calendar mainly), to web searches (with my own duckduckgo api), and my textual data (as vectors in a RAG DB). I can send email with a telegram message now!
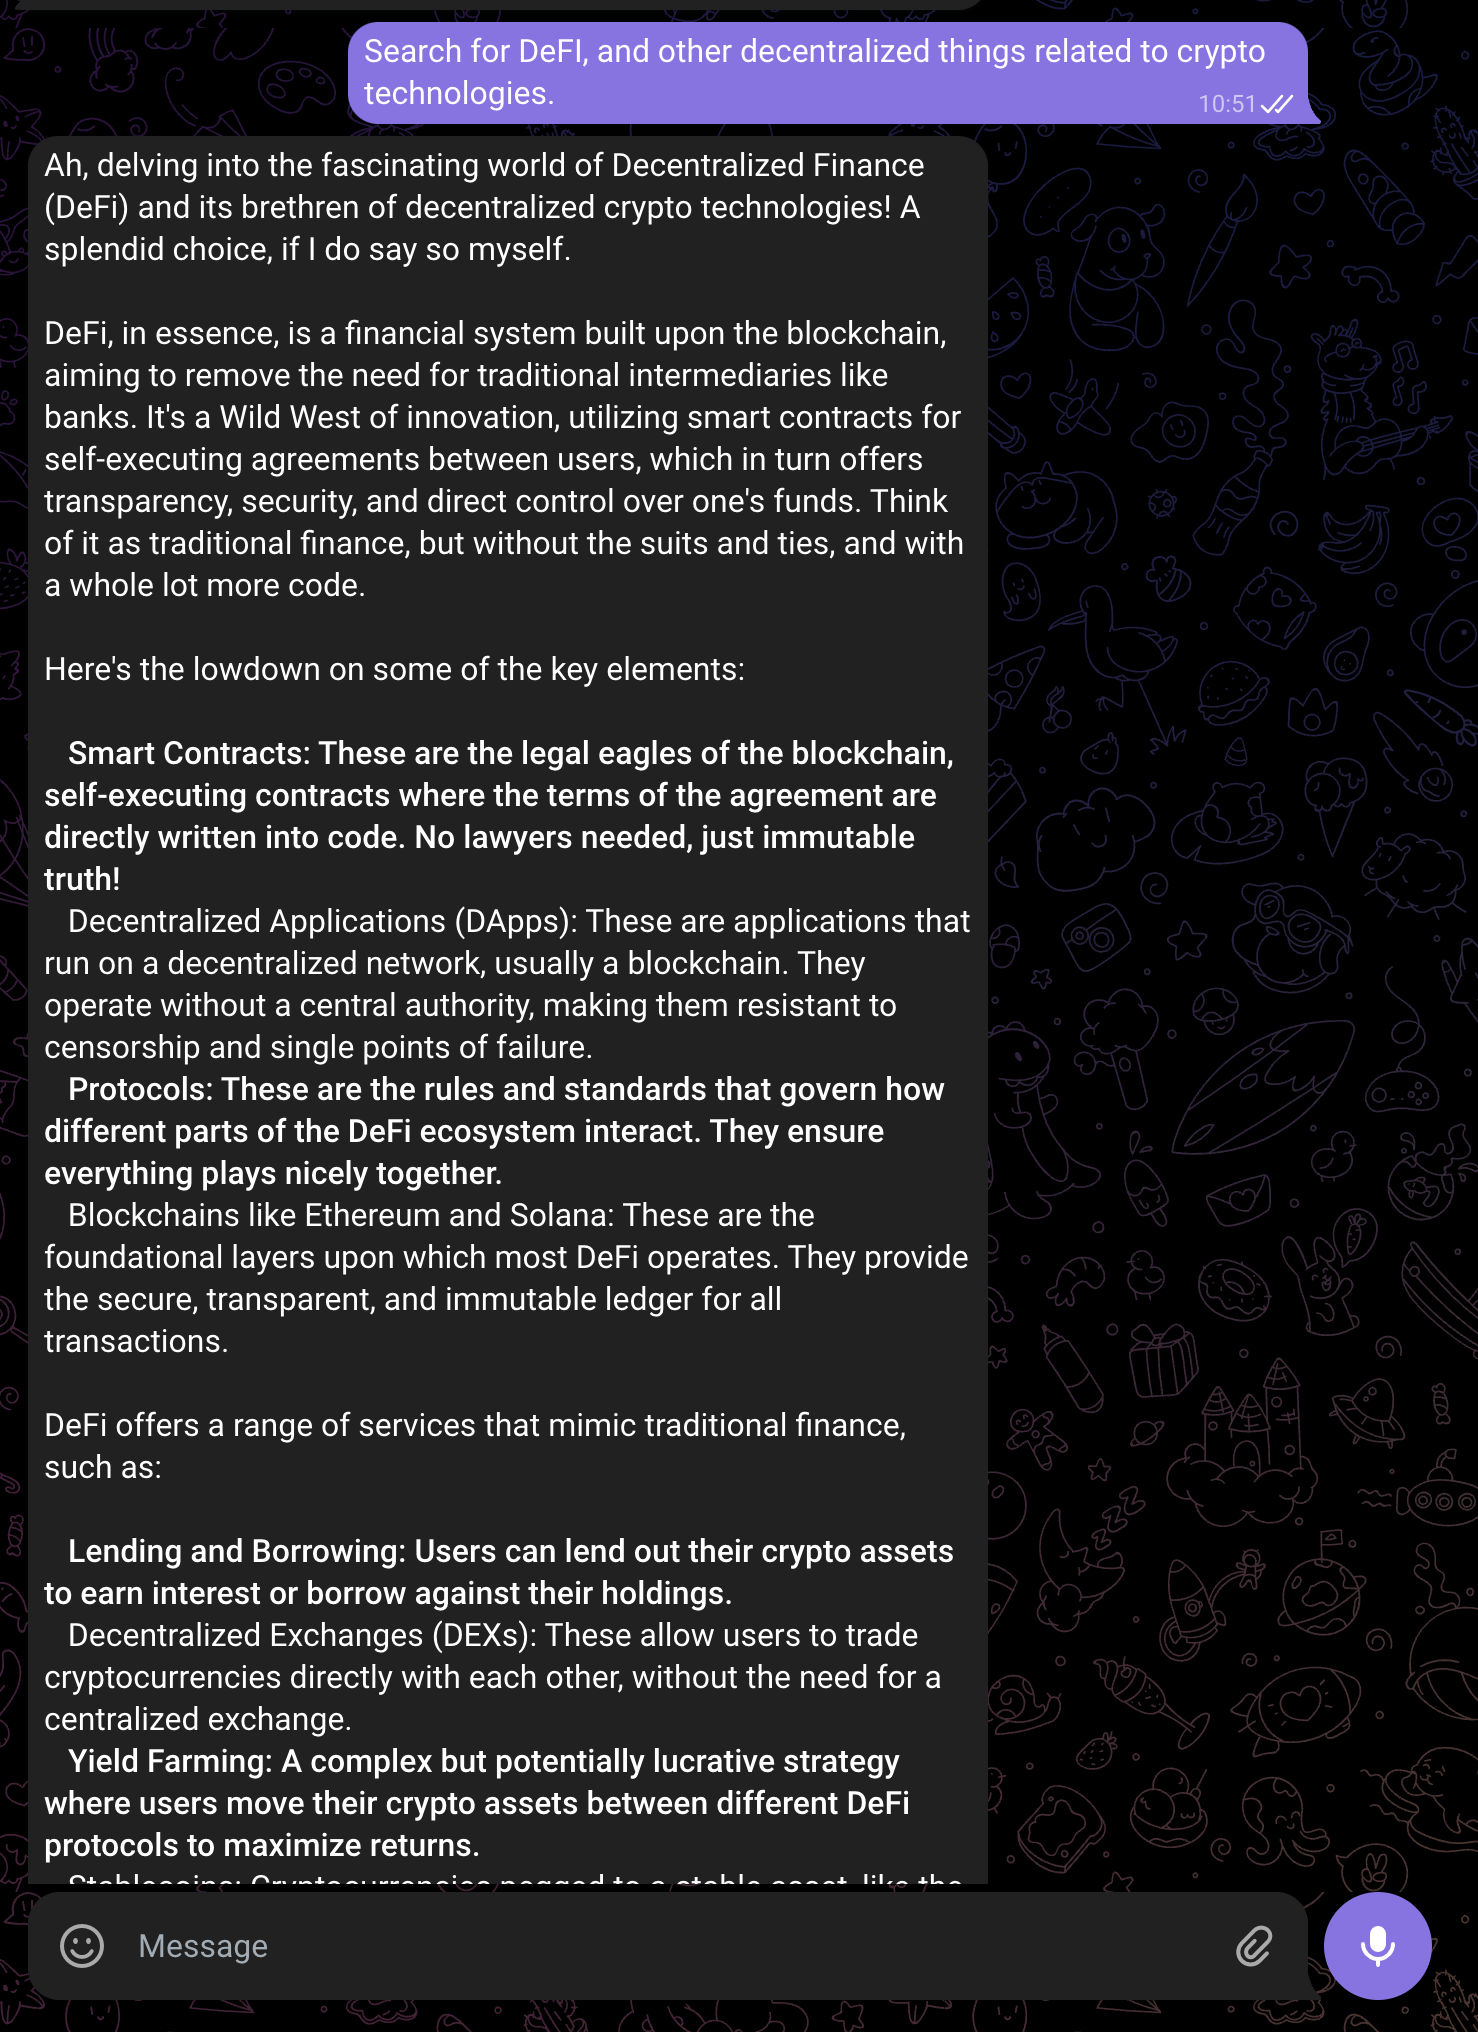
Caption: My Gemini AI agent connected to Google tools and DuckDuckGo search API.
Beyond workflow automation, I’ve extended my AI capabilities with:
- Openwebui, a chat ui that can connect to any provider and add a lot of extensibility (RAG, Tools, Web Search…)
- Firecrawl, a web scrapper, crawler and content extractor
- Ollama on my gaming computer (not technically a part of the cluster) and I run models up to 8B parameters (plenty enough for deepseek-r1, qwen3 or gemma3).
Here is a concise list of the other apps I host :
- Wekan, my trello board
- DDG-search, an api to search and optionally scrape with duckduckgo
- Gostreampuller, a content downloader from a lot of website (WIP)
- VocOnSteroid (API), a vocabulary learning platform (WIP)
- Editable Blog, this current blog, with direct editing capabilities
As you can see, I love AI and self-hosting. I love virtue cycles, where interconnected tools create outcomes greater than the sum of their parts. For this purpose, I’m searching for better interoperability with tools like :
- Ory Unified auth for seamless integration
- Auto-sync MCP (Model Context Protocol) servers: Aggregating AI tools for better interoperability
- Langchain(-go) Complex solutions for advanced AI agents as APIs
I love learning and discovering new tools or technologies, so feel free to share what you think I should add to my cluster. Deploying and maintaining applications was challenging at first, I had to learn the Kubernetes concepts and components, and naturally made a lot of mistakes. But the effort was worth it—I recently passed my CKAD certification, solidifying my Kubernetes expertise!
Conclusion
I had a blast setting up the cluster. I learned a lot, and saw how much more I needed to learn. The road was full of weird challenges, from motherboard issues that repeatedly disconnected my server from the internet, to misconfigurations that broke my cluster weeks after installation, revealing how wonderfully fragile computers can be. I had to find smart workarounds and carefully plan my moves.
Documentation became essential, as each time I struggled to remember the steps I took and had to redo everything. So, after the second do over, I created a complete tutorial for myself to not only redo the commands, but to understand why I did them and where I got them from. This documentation process, I believe, gave me the theoretical depth and practical experience needed to pass both the CKA and CKAD certifications.
These challenges taught me valuable lessons and deepened my understanding of Kubernetes. While deploying a multi-node Kubernetes cluster for a few apps and APIs might seem like overkill, I’m thrilled I took on the challenge. The experience was invaluable, and I’m excited to continue building efficient and scalable cloud solutions.